How dry is my wood?The answer to the question: "how dry is my wood?" is one of the most important things for a woodworker to know. For a woodturner making such items as bowls or lamp bases, where a certain amount of distortion is acceptable, it may not be very critical. But when he is making items which will have parts inserted in them, such as ceramic tiles, or lids, or anything where excessive movement is likely to be a source of embarrassment, it becomes very necessary to ensure that the wood is sufficiently dry. The standard measure for the dryness (or wetness) of timber is the moisture content (abbreviated to MC). This is found by expressing the weight of the water in a sample of wood as a percentage of that sample when it is completely dry. A simple and effective way of carrying out this measurement is to take a small sample of wood, then:
The moisture content can then be obtained from the following equation: MC% = (initial weight - oven dry weight) x 100 oven dry weight The moisture content can be found with the aid of a meter but meters are expensive and few of us have access to one. There are also limitations on the accuracy which they can achieve.
There are two types of meter:
Even with long probes the resistance meters can only measure the MC of a piece of wood on its outer surface. Most pieces of timber will have a moisture gradient between the inside and the outside. Consequently a meter reading taken on a board which has been hanging around for some time can be misleading; this is why meter readings should be taken only on a freshly sawn surface. In contrast the field of a dielectric meter will penetrate deep into the wood - here the difficulties are created by variations in the dielectric properties of the wood. Due to the differences in the characteristics of the various species of wood great care must be taken when using any type of meter to ensure that the results are interpreted correctly. The oven method also has certain disadvantages. The biggest drawback is that it results in the destruction of the sample of wood being measured. It also needs some equipment; namely an oven and a sensitive pair of scales for weighing the sample. However, the equipment can be made quite easily and the sample need not be very large, say 100-150 grams in weight. For example, when I am making a clock (which is to have a ceramic tile face inserted) I usually cut the circular blank from a square piece of board. This leaves four waste corner pieces which become my sample. Incidentally, several small pieces of wood will dry more quickly than one large piece; there is no reason why the sample should not be cut up - as long as this is done before it is weighed. The sample can be dried in the domestic oven but as it takes several hours even for small pieces this is a waste of heat. As the oven need only be small it is easy to make one from a tin of a suitable size with an electric light bulb to supply the heat. My own oven was made from a discarded 5 litre oil can fitted with a 100 watt bulb.
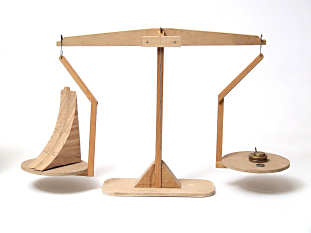
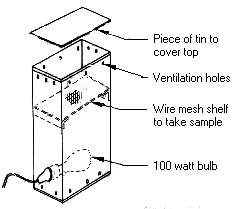 Fig 1: An oven made from an oil can Photograph Sensitive scales can be expensive but with a little ingenuity they too can be home made. The photograph below shows the set that I have made for myself. They may look a little crude but they work well. The beam and the suspension points for the pans rest on knife-edges made from sections of craft knife blades. There is no reason why such a balance should not be reasonably accurate. For a 100 gram sample the degree of accuracy needs to be about plus or minus 1/2 gram (i.e. 1/2 per cent).
In addition to a set of scales, some weights are required. If a set of commercial weights is not available more ingenuity will be required. It should be noted that the samples do not necessarily have to be weighed in conventional units such as grams or ounces - therefore, any small metal objects which come in standard sizes, such as washers, nuts, bolts or wood-screws, can be utilised as the basic unit of weight. The balance can then be used to find a suitable larger object which is equal to, say, 10 of the basic units; and still larger ones to equal 50 or 100 basic units. Having found a means of determining the actual MC of a sample of wood it is necessary to consider what the desired MC should be. When a 'wet' piece of wood is put in a 'dry' environment its MC will fall as the water in it evaporates. At a certain point, determined by the relative humidity (RH) of the surrounding air, the evaporation of the moisture will cease. The wood will then be said to have reached its 'equilibrium' MC (EMC). After that the MC will rise and fall as the RH of the air rises and falls - with the change in MC so the wood will expand and contract. The relative humidity is the ratio of the amount of water vapour present in the air to that which it would hold at saturation at the same temperature. Cold air holds less water vapour than warm air; as a consequence when cold air is admitted into a centrally heated environment the humidity falls to a low level. In a test made in Wisconsin (USA) indoors in the winter, the MC of a wood sample fell to 3%. This is very extreme, however, and in the UK it is customary to think in terms of a minimum MC of 10% as a national average. Due to the equable climate of the UK, neither the seasonal nor the regional variations are as great as in other parts of the world. There is, however, one other factor which must be considered. The minimum MC attained by a piece of domestic turnery, will depend on where it is placed in the house. For instance, a clock put on the wall of the lounge over a radiator will get much drier than one in an unheated hallway. One of the problems to be faced by the maker is that he does not know where one of his products will end up. Although one should be aware of all the factors affecting the movement of the wood, in practice it is necessary to adopt a rule of thumb. A reason for this is that however carefully the procedures described in this article are carried out, the variability of timber means that the results will not be perfect and the desired MC will not be achieved with absolute precision. Nevertheless, they will be good enough to ensure that one has the situation under control. In those circumstances where the movement of the wood might lead to damage, my method is to aim at an MC of 10% to 12%. If the wood I have selected is not dry enough then I dry it some more by the methods discussed below. Then when I turn it I make sure that there is sufficient clearance in the important places to take care of any further movement. As a rough guide to the amount of clearance that should be allowed it is found that most common timbers will shrink by 1.5% to 2% across the grain with a fall in MC of 5%. If, for example, I am making a clock to take a 150mm (6 inch) diameter ceramic tile insert I allow for a maximum fall in MC of 5%. As a consequence I have a gap of l.5mm all round the tile, this gives a total allowance of 3mm (or 2%) across the width of the tile. Timber which has been kiln dried will probably have an MC of 12% to 15% and will, therefore, be suitable for most purposes. It should be remembered, though, that it will begin to pick up moisture as soon as it comes out of the kiln unless it is stored in a place with low humidity. Air dried timber on the other hand, usually has an MC in the region of 18% to 20% and, for the kind of purposes being considered here, may well have to be dried further - this further drying is known as conditioning. If there is no need for haste the simplest way of conditioning timber is to place it in an environment similar to that which the finished piece will occupy. Unfortunately, this is seldom practicable and so to speed up the process some way has to be found to create an environment which is warmer and drier than normal. It need hardly be said that timbers vary enormously in their response to drying methods. I have found, for example, that ash is very forgiving - even when samples are baked dry in the oven they often do not split. Others, such as yew, have to be treated with great care. Trial and error, experience and the exchange of information with others, are the only guides. My own experience of the conditioning process is based largely on the ash which I use for clocks. In winter I have found that a considerable number of clock blanks can be conditioned quite quickly over a storage heater. I stand them on edge with a gap between each one - they are, of course, raised above the heater as well - and I rotate them through 90° every day. In summer the blanks can be placed in a box with a low wattage heater (eg a couple of 100 watt light bulbs). A place favoured by many turners for small quantities (if their partner does not object) is the airing cupboard, which is available summer and winter. I tried a microwave oven for small pieces with some success. If you want to have a go I suggest you use the oven on the defrost setting starting with short periods. Whatever method is used for the conditioning process it is necessary to follow a regular procedure to ensure that the desired level of MC is attained. My own procedure is as follows. First I find the MC of a reasonably representative sample of the batch of timber I am going to use. When taking this sample I avoid the end of a board (as this may be drier than other parts) and untypical pieces such as a large knot. It must also be weighed immediately after it is cut. Having found the MC of the sample I assume that the rest of the batch will have the same MC. I then cut up the rest of the timber into blanks as soon as possible. Then every blank is immediately weighed and the weight marked on it. Once that is done the pieces can be conditioned at leisure - they will probably start to lose some weight (i.e. water) as soon as they are cut. After a blank has had its initial weighing the target weight (ie the weight it will need to be to attain the required MC) can be calculated and that too, marked on the blank. The formula for calculating the target weight is as follows:
Required weight =initial weight x  (100 + required MC)
                                   (100 + initial MC)
Once the required weight of a blank has been calculated it will be possible to monitor the MC at any time by weighing the blank. If the blanks are weighed at regular intervals, then as soon as any blank has reached the target weight it can be withdrawn from the conditioning process. © Brian Clifford (April 1999) |