An introduction to the design of vessels1. Introduction Help and information on the technical aspects of turning vessels are readily available from books, magazines, clubs, videos and personal tuition. With sufficient determination and application most aspiring tuners will be able to achieve the necessary level of skill. In contrast guidance on the design of vessels is much less freely available. One of the reasons for this is that it is a complicated and controversial subject. However, what many novice turners need is simple practical guidance on the creation of some attractive basic forms. These notes are provided in thehope that they will go some way to fill that need. 2. Important aspects of the design of vessels There are four major aspects to consider when designing a vessel: (i) the form; (ii) the foot; (iii) the rim; and (iv) the application of decoration. The form is the overall shape of the vessel when considered in three dimensions. This is what is most clearly seen when a vessel is observed from distance and which most readily conveys the overall impression of the piece. Because of this form is the most important aspect and deserves the most attention. In the following we will be looking at the way our ideas on form can be developed from simple geometrical shapes. First we will consider simple shapes based on rectangles, progress through the use of curves such as arcs of circles, and then proceed to the trapezium, the ellipse, the hyperbola, the catenary, the ogee curve, the egg shape and French curves. I must it clear that I am not suggesting that the beginner should stick rigidly to these geometric forms. I am using these as a source of ideas and to provide a structured means of developing an eye for form. 3. Forms based rectangles and arcs A standard bowl blank, which is a simple disc, can be seen as a very short cylinder. Seen from the side it takes the form of a rectangle and as such is totally uninteresting. Suppose, however, that we place another, smaller, cylinder underneath it we can create a somewhat more interesting form (see Figure 1).
Figure 1: Some basic shapes
This provides a very basic shape that may have some merit if the correct proportions, appropriate material and finish are used. These forms can be made more striking by the use of a wood with a uniform colour and little figure. They could also be painted. The combination of a plain colour and basic shape can produce a piece of minimalist art. Alternatively the outline could be softened by putting a radius on the lower part as in Figure 2. This gives the eye more to take in makes a marked difference to the overall effect.

Figure 2: The addition of a curve
(See photograph Another simple way to modify the basic rectangle is to round off the bottom corners This form is improved by the addition of a foot, as in Figure 3, but it still lacks real interest and we need to see how the form can be developed using some other basic geometrical shapes. 
Figure 3: A simple bowl with a foot
4. The triangle and the trapezium If we move away from the plain rectangle to more angular forms we can introduce more variety. A triangle is another basic shape. When inverted it can be used as the basis for a simple goblet form.

Figure 4: A goblet based on the triangular form
(See photograph)
Figure 5: The trapezium
If part of the triangle is cut off we get one of a family of shapes known as the trapezium (see Figure 5). A problem with these forms is that they used by common utilitarian objects, such as flowerpots, with which we have become over familiar. The basic trapezium form can be modified by changing the straight sides to concave or convex curves as in Figure 6.
Figure 6: Modifications to the trapezium
Another way we can play with the basic shape of the trapezium is by putting two together, one on top of the other, and then altering the proportions as in Figure 7.
Figure 7: More modifications to the trapezium
(See photograph) If the straight lines are changed into gentle curves another family of shapes can be created (Figure 8).
Figure 8: Curves added to the trapezium
(See photographs) In comparing Figures 1 to 6 with Figures 7 and 8 a distinction can be made between 'open and 'closed' forms. In the latter case it can be seen that the opening in the top is smaller than the widest part of the bowl. This is what is described as a closed form. Closed forms are often very attractive but the undercut rim may pose technical problems for novices. The complete novice is advised not to try these until some experience has been gained. 5. The spheroid When a piece is turned on the lathe which has the profile of an arc of a circle the result is a section of a sphere. The variations that can be made on a sphere are somewhat limited. When a sphere is cut off at, or below, the halfway line sets of open forms can be produced, as in the profiles shown in Figure 9.
Figure 9: Open forms based on a sphere

Figure 10: Closed forms based an a sphere
(See photograph) If we flatten the bottom of a sphere we get what is know as an oblate spheroid. When a bowl is created in this form (Figure 11 and photo) it is found that, even without a foot, it will sit upright on a flat surface. However, when touched it will rock gently from side to side in an intriguing manner. It is also comfortable to hold in the hand when used as a receptacle for small eatables such as sweets or nuts.

Figure 11: Closed form based on an oblate spheroid
(See photograph) The spheroid form can also be used for a goblet (Figure 12).

Figure 12: A goblet
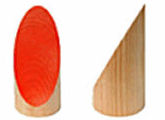
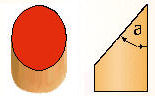
6. The ellipse An ellipse is formed by cutting through a cylinder at an angle. The relationship between the major and minor axis is determined by the angle at which the cone is cut. The length of the minor axis will always be the same as the diameter of the cylinder. The length of the major axis will depend on the angle at which the cylinder is cut.
This can be seen by comparing Figure 13 with Figure 14. As angle 'a' is decreased so the length of the major axis will increase (and vice versa).
Figure 15: The ellipse
The ellipse with the major axis horizontal can be used to create profiles for bowl shapes. An open saucer form can be produced by cutting the ellipse on or below the centre line (Figure 16) and a closed form by cutting above the centre line (Figure 16).
Figure 16: Open bowl forms based on the ellipse
Figure 17: Closed bowl forms based on the ellipse
If the ellipse is turned through 90 degrees, so that its major axis is vertical, we have a basis for other types of vessel such as vases, cups and goblets as in Figures 18 and 19.
Figure 18:Vase forms based on the ellipse
Figure 19: Goblets based on the ellipse
7. The hyperbola The hyperbola is produced by cutting a slice off of a cone (see Figure 20). The shape of the hyperbola will be determined: (a) by the relationship between the height of the cone and the diameter of its base, and (b) by the angle between the plane and the base.

Figure 20: The hyperbola
When a hyperbola is used in the attitude shown in Figure 21 it flares outwards with relatively straight sides. When used in this attitude the flare-out means that it can only be used for open forms.
Figure 21: Vessel forms based on the hyperbola
These forms are similar to those produced by adding concave surves to the trapezium (see Figure 6). However, the full curve of the hyperbola can be used to create a very subtle form for a goblet (Figure 22).
Figure 22: Goblet forms based on the hyperbola
In addition, if the hyperbola is turned through 90 degrees and rotated around a fixed point, as shown if Figure 23, a series of closed forms can be produced.
Figure 23: Closed bowl form based on the hyperbola
8. The catenary The term "catenary" is derived from the Latin for "a chain". In mathematics, the catenary is the shape taken up by a chain or cable when hanging by its ends as in Figure 24. The shape of the catenary can be calculated mathematically but the simplest way to see it is to hang up an actual piece of chain. It will be seen that the curve will change according to the length of the chain and the distance between the two suspension points (Figure 24). The catenary is similar to a hyperbola but more rounded. Like the hyperbola the catenary can only be used as a basis for the profile of open form bowls, vases, and goblets.

Figure 24: Examples of the catenary
Figure 25: Vessel forms based on the catenary
As with the hyperbola, if the catenary is turned through 90 degrees and rotated about a fixed point then some more profiles can be produced. These will be similar to those produced by the hyperbola but much more rounded. 9. The 'ogee' curve An ogee curve is a smooth curve which is approximately 'S' shaped. When we speak of the ogee curve we are really referring to a whole family of curves of this nature. The curve shown in Figure 26 is just one example. Basically it is made up of two simple curves which flow smoothly into each other. This curve has many uses in woodturning.
Figure 26: an example of an ogee curve
Figure 27 shows the way the ogee curve can be applied to vessels. It is easy to see that there are families of these forms.
Figure 27: Forms using the ogee curve
(see photographs) 10. The egg shape Strictly speaking the egg shape is not a geometrical shape. Nevertheless it is a simple shape and I think it is reasonable to consider it as one of the basic shapes similar to those discussed above. Egg shapes can be constructed by combining ellipses with minor axes of the same length but major axes of different lengths.
Figure 28: Egg shapes created from ellipses
These shapes are most useful for creating hollow vessels by turning them through 90 degrees. They can be used either way up (see Figure 29).
Figure 29: Vase forms based on the egg shape
(See photograph) 11. French curves French curves provide another source of inspiration for the shapes of vessels. They are also very useful as an aid to drawing. These curves are templates made from a combination of different curves. They most commonly come in sets of three that are known as the Burmester set. They can be purchased from good stationery stores and suppliers of art materials.
Figure 29: The Burmester set of French curves
An interesting thing about these curves is that no section is the same as any other section. I have been unable to find any information on the how French curves are produced or how they came by that name. 12. The foot A "foot" is a distinct element formed on the base of a vessel. It is not imperative that a bowl or a vase should have a foot but in some cases it will be necessary to ensure that the piece stands securely. Sometimes, too, it will enhance the appearance of the piece by lifting it off the surface on which it sits. It is important that although the foot is distinct it should form an integral part of the the overall design. How big should the foot be? As far as bowls are concerned I have seen it suggested that the foot should be 30 per cent of the diameter of the bowl. This may be a safe figure for many bowls, however, bowls come in many different shapes and sizes and it is doubtful that there is any ratio that is correct for all bowls. Furthermore, although 30 per cent may very often be a safe figure sticking to that all the time may end up with too much similarity.
When thinking about the foot of a goblet consideration should be given to the following points: 1 The distribution of the 'weight' of the piece in the visual sense. For example, if a goblet has a very small bowl and a very large base the proportions will probably look wrong. 2 The distribution of weight in the physical sense. for example if a goblet has a very thin bowl but a heavy foot it will feel wrong when it is picked up. There is a common view that all signs of how a vessel has been held on the lathe, particularly the recess for the expanding jaws of a chuck, should be removed from the finished piece. I will stick my neck out to say that I don't agree with this view - certainly not for all types of vessels - as long as the recess is integrated into the design and incorporated into a nice foot. However, since this view is so widespread, there are certain occasions when it would be unwise not to remove signs of how the piece was held. These are when the piece will be entered into a competition, or when it is intended as an art object that is likely to be picked up and examined carefully. But in other circumstances, particularly where the bowl is intended for use, such as holding fruit, few people will pick the piece up to examine it. It is only woodturners who pick things up and look critically at the bottom of such items. What I think is much less acceptable is to form the recess for the jaws of a chuck in the bottom on a bowl that has no foot. This is undesirable for two reasons: (i) the recess is a negative intrusion into the flat bottom which can have no aesthetic justification, and (ii) unless the walls of the vessel are thick and chunky the recess will create an area of weakness in the bottom of the bowl.
Figure 30: A recess in the bottom of a bowl that has no foot is not desirable
My favourite way of finishing the base of a bowl that is made for use, rather than decoration, is shown in Figure 31. Note that the depth of the recess is the same as that of the foot so that the thickness of the walls is maintained throughout the base.

Figure 31: The recess in a foot
(See photograph) There is a danger that if the recess is too small in relation to the foot then it can look wrong. It may be redeemed if some decoration, such as concentric grooves, is added. 13. The rim I suggest that until they have mastered from novices should keep the rim simple. If the form is poor then no amount of attention to the rim will redeem the piece. Attention can be drawn to the rim by some simple decoration just below it. This can be done with a bead, grooves, or simply an incised line. However, when these details move away from the rim they tend to become part of the general decoration. I advise novices not to round over the rim. Nice sharp edges define the limit of the rim and give the eye something to focus on. Please note, however, that the outside edge of a shallow saucer shape like those shown in Figures 9 and 16 can become dangerously sharp. I have cut myself on such an edge on more than once. Just a touch with an abrasive is enough to make the edge smooth, and so remove the danger, but the eye will not see the difference. 14. Decoration Decoration is embellishment of the form that is intended to add interest when the piece is given closer inspection. This may include the use of such elements as beads and coves, carving, burning, piercing, texturing and colouring. Taken to the extreme decoration can become the primary concern of the maker and the piece of turning becomes the canvas for a painting, or the scaffolding on which a carved object or a sculpture is developed. These activities entail a broad range of skills and take us into realms with which do not concern us here. As far as the novice woodturner is concerned I think, that although decoration can add aesthetic value to a piece of woodturning, it should be applied with considerable thought and great care. In the foregoing I have treated form as the most important aspect because if the form is poor then no amount of decoration will rescue the piece. Furthermore, a good simple form will stand on its own and require very little in the way of decoration. Novice woodturners are advised to concentrate their efforts on achieving good forms. Once the turners have mastered form they can move on to more adventurous things. © Brian Clifford, October 2007 |