Home
PDF file for printing
A simple box
IntroductionTurning boxes can be a source of considerable satisfaction not least because they require a certain degree of skill. There is the challenge of creating a satisfactory design, making a well fitting lid, and finishing the box to the level required for an object which is likely to be treasured by its owner for many years. Small boxes can be used for keeping many things: stamps, pills, paper clips, buttons, as well as rings, and other small pieces of jewellery, in short any of those small items which we all seem to accumulate. Almost any hardwood may be used in the making of a box. The main thing is that it should be well dried; if is not the the box may distort as it continues to dry out and the fit of the lid may be spoiled. Air dried wood will require some further drying in a warm place, such as a centrally heated room in winter or an airing cupboard (see 'How dry is my wood'). Method oneThe easiest way to turn a box is one shown in some of the earlier turning manuals. The workpiece is held by one end, either in a chuck with compression jaws, or on a screw. When the screw chuck is used a piece of scrap wood can be glued on to save wasting more valuable material. The general arrangement of the worpiece is shown in Diagram 1. This shows the position, and the orientation, of the lid and the body as they will eventually be formed.
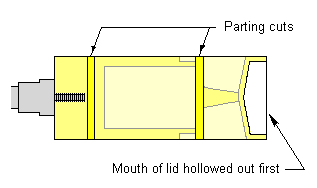
Diagram 1: General layout of box Note that the first operation is to hollow out the inside of the lid and form the mouth. The lid is then parted off leaving sufficient material to turn the knob at a later stage. The next step is to hollow out and finish the inside of the body. Then a spigot is turned on the body and sized so that the lid will be a nice fit. The lid is fixed on this spigot and the top is shaped and (see Diagram 2). The outside of the body of the can also be shaped in a manner to suit the lid.
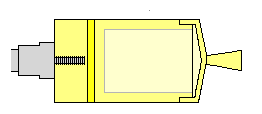
Diagram 2: Box with lid fitted and formed The merit of this method of making a box is that the workpiece only has to be chucked once. The blank is put on a screw chuck and does not have to be removed until the job is finished. Against this, it must be admitted it has is a serious drawback. Because, in effect, the lid is turned upside down in relation to the body, the grain, or figure, in the wood will not run in a continuous pattern from the bottom to the top. Method twoThere is alternative way of making a box which requires only one chucking, and does not require the lid to be reversed, but this, too, has a drawback. This is that the lid cannot be hollowed out. This is fine if the box is small but otherwise is unsatisfactory. The general arrangement for this is shown in Diagram 3. In this case the top of the lid and a groove (to form a spigot on the lid) are formeded before the lid is parted off.
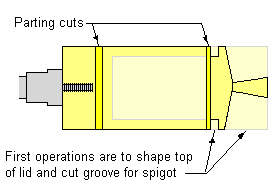
Diagram 3: A box with a solid lid Note that the parting cut made to separate the lid from the body should be as thin as possible. Ideally the grain in the wood should run through the body and into the lid in a continuous pattern. If the grain runs at an angle, the greater the distance between the two parts, the more disrupted the pattern will be (see Diagram 4). Losing some material in the formation of the spigot cannot be avoided.

Diagram 4: Disruption of grain caused by parting off and the formation of the spigot Method threeFortunately, it is not too difficult to modify the above procedures to cope with these problems. A chuck with contracting collets (eg on a spigot chuck) is better for this method but I will also explain how it can be done on a screw (see below). When contracting collets are used the blank is roughed down to a cylinder between centres and a small spigot turned on each end. It can then be divided into the two parts for the body and the lid. Figure 3 shows the workpiece fitted into the compression jaws of a chuck before being divided. The piece for the body is parted off with the thinnest parting tool available. The workpiece could also be separated into two parts with the aid of the bandsaw. In this case a deep groove is made with the thin parting tool whilst it is still held between centres. This acts as a guide for the saw cut.
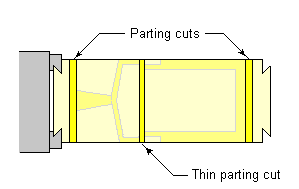
Diagram 5: Another way of making a box The inside of the lidWith the lid mounted in the chuck the inside can now be hollowed out. At this stage we need to consider the way in which the body and the lid of a box are fitted together. The lid will be made first so it is convenient to make the body of the box the male part. This facilitates the fitting of the lid to the body. It is much easier to adjust a spigot on the body than it is to take wood from the inside of the body to accept a spigot on the lid. Note that the sides of the mouth and the spigot must be made to form a section of a perfect cylinder. If this is not done they will not fit properly. Having formed the mouth of the lid, the remainder of the inside should be shaped in a way which will conform with the intended shape of the outside. Much of this work can be done with a small bowl gouge but some use of a scraper will be required. When the desired shape has been achieved the inside of the lid is sanded and polished. When sanding, care should be taken not to spoil the cylindrical shape of the mouth. The lid can now be removed from the chuck and replaced with the blank for the body. Hollowing the bodyThe first step with the body is to hollow out the inside. The reason why this is done first is that the removal of the wood may release stresses which may cause some distortion to take place. If the lid is fitted first this might spoil the fit. As much material as possible is removed with a small bowl gouge. There is a limit to how much can be taken out with a gouge if the bevel is to be kept rubbing; the remainder will have to be scraped out. As with the lid the inside of the body must reflect the shape which will be given to the outside. If it is felt necessary templates can be made. If the body has square corners at the bottom it may help to grind a scraper to a special shape. This is shown if Diagram 6. This scraper can be used to clean up the side walls, the bottom and the corner iteslf.

Diagram 6: Shape of special scraper The fit of the lidHaving partially hollowed out the body the short spigot, on which the lid will be fitted, can be formed. As the lid will be held on the body in order to turn the top the fit needs to be reasonably tight. Getting a good fit between the lid and the body is the most difficult part of making a box. Unfortunately there is not much one can say which will be of much help to the beginner. The best advice is to use a scraper in the final stages whilst proceeding with extreme caution. If too much material is inadvertently taken off it is often possible to hold the two together with paper packing. When turning the outside of the lid with it held in this way the tailstock can be brought up to support it. If the shape of the box will allow it, putting piece of masking tape around the join that may also help. The fit of the lid can also be too tight. When it has been turned and finished the lid has to be removed. As I have found on a number of occasions this may be a problem. The lid will now be very smooth and polished. If it has been fitted onto the spigot very tightly, it can be difficult to obtain sufficient purchase on it to pull it off. As a consequence a compromise is required: it should be tight but not too tight. Finishing the lid and the bodyWith the lid fitted in place in place in this way the outside of the lid can now be turned. After that the outside of the body is shaped so that its form complements that of the lid. Then outsides of both the lid and the body can be sanded and finished and the lid removed. Before proceeding it may be necessary to ease off the fit of the lid. This may be required because the fit was made tight enough to enable the outside of the lid to be turned on the body. When it is in use the owner will want to take off the lid without difficulty. So a slightly looser fit may be by required; but how loose? Opinions tend to differ about this: it depends to some extent on what the box is to be used for. It's down to the maker's judgement. When the inside has also been sanded and finished the body is parted off. The bottom of the body can now be finished either by sanding on a disc, or a belt sander, or by turning. In the latter case a spigot is turned on the waste left on the chuck so that it is a tight fit in the mouth of the body. With the box held on this spigot (see Diagram 7) the bottom can be turned to the desired shape; it may, for instance, be given rounded corners.
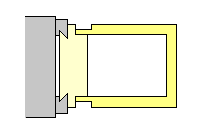
Diagram 7: Body of box reversed onto waste wood Turning the box on a screw chuckIf this type of box is to be turned on a screw chuck a square blank is selected which will have sufficient waste wood at each end for fixing on the screw and for three parting cuts. Alternatively, some scrap wood can be glued onto the ends of the workpiece to take the screw. In either case the ends of the blank are cut as square as possible before proceeding. Diagram 8 shows the general layout of the parts. The blank is fitted to the screw chuck, the tailstock is brought up in support and workpiece is roughed down to a cylinder. With the tailstock withdrawn the outer end of the workpiece is squared up. This is most easily done using a small bowl gouge taking very light cuts. Since this face will later be fitted on the screw chuck it must either be dead square or slightly dished. The tailstock is then brought up again to support the workpiece whilst a preliminary parting cut is made to separate the two sections. The use of a narrow parting tool has the double advantage that it will not only reduce the disturbance to the match in the grain (between the body and the lid), but will also reduce the stress on the screw mounting. When the thickness of the wood has been reduced to 1/2 in, or so, the tailstock is again withdrawn and the parting cut completed. The final act of separation may be done with a saw if so desired. The section removed, which will be used for the body, is put to one side for the time being. The piece remaining should be left on the screw (see Diagram 8).
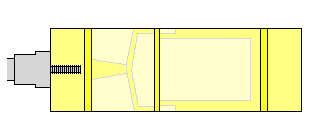
Diagram 8: The layout of the blank when using a screw chuck Later, when the body section is attached to the screw chuck, it is highly unlikely that it will align perfectly with its original axis. As a consequence some material will have to be removed to make the cylinder run true. To allow for this the diameter of the work piece left on the screw chuck for the lid must be reduced. How much it is reduced is a matter for judgement; it depends on the dimensions of the box and how inaccurate the re-chucking is likely to be; but it is much better to take off too much than too little. In the latter case the only option will be to start all over again. This must be borne in mind when determining the size of the blank at the beginning of the job. Having turned the outside of the lid to the required diameter the inside can be hollowed out, sanded, finished and parted off. The piece of waste wood left on the screw is then removed. The blank for the body is drilled with a pilot hole for the screw on the mark made by the tailstock centre. Care must be taken not to drill too deep, otherwise the hole may pierce the bottom of the box. The blank can now be fitted onto the screw and trued up. From this point on the procedure is the same as that described above.
© Brian Clifford (August 1999)
|