INTRODUCTION TO WOODTURNING
Chapter 14: Cutting a cove
14.1 Preparation
A piece of softwood, similar to that used in previous exercises, ie two by two by twelve inches long, is fixed in the lathe and the speed set to around 2000 rpm. The square is then roughed down and planed smooth.
14.2 The tool
A spindle gouge of the appropriate size is used for this cut. To give some indication of the size: the width of the gouge should be about one quarter of the width of the cove to be cut. So if the width of the cove is to be 1 1/2 in. a 3/8 in. spindle gouge should be employed. A beginner, practising with a limited set of tools, can make the width of the cove fit his tools, rather than the reverse.
14.3 The shape of the cove
When making actual objects coves may be all manner of shapes, providing they are some sort of hollow. From a practising point of view what one should be looking for is a nice smooth curve approaching an arc of a circle.
14.4 Marking the size of the cove
The great majority of the cutting of a cove is done with the spindle gouge but, as an initial step, it is a good idea to mark the outer extremities with the point of a chisel. There are two reasons for this:
- the marks define exactly where the cove is intended to be;
- they help to prevent the gouge skidding out of the cove and so damaging the adjacent surface.
These marks can be made with the point of any chisel (including the beading and parting tool) held with the cutting edge vertical (See Diagram 14.1). These cuts should not be very deep.
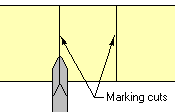
Diagram 14.1 The cuts made to mark the edges of a cove
14.5 The first stage in making the cut
To start the cut on the left side: begin by laying the tool on its back just to the right of the left-hand marking cut with the bevel rubbing (as shown in Diagram 14.2 A). Twist the tool clockwise around its axis until the tip begins to cut. Slide the tool to the right whilst maintaining the cut with the bevel continuing to rub. In order to keep the bevel rubbing it may be necessary to feed the tool forward. Stop the cut at the position midway between the two marking cuts - in other words, in the middle of the cove (Diagram 14.2 B). When this point is reached repeat the cut starting on the right-hand side. Repeat these cuts on alternate sides, always stopping in the centre, until a shape similar to that shown in Diagram 14.2 is formed. Remember that on spindle work cuts made from a larger diameter to a smaller diameter go with the grain. In this case going with the grain is cutting from the outside of the cove to the centre.
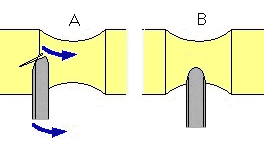
Diagram 14.2 The first stage in cutting a cove
14.6 The second stage in making cutting the cove
When the hollow of the cove has been partially formed by the method described above there comes a point at which the tool may catch and be thrown backwards along the work-piece ripping a nasty gash in the wood as it goes. This tends to happen when the sides of the cove are becoming relatively steep. Consequently once a shallow hollow has been formed a change of tactics is required. The way to prevent a catch is to ensure that at the commencement of each operation the cutting edge of the gouge is vertical as it enters the wood. If it is not vertical it acts as an efficient screw cutting device and will wind itself out of the cove. The correct attitude of the cutting edge can be achieved by watching it carefully as the tool is manipulated into position. Many beginners, however, will have problems with this. Fortunately, there is an easier way to achieving the required entry. This requires a little preparation.
14.7 Preparation for stage two
In preparation for the second stage of making the cove adjust the height of the tool rest so that when the spindle gouge is laid on its side in a horizontal position the tip of cutting edge is level with the axis of the lathe. Whilst the tool is held in the horizontal position, place a ruler across the flutes (as shown in Diagram 14.4) and turn the tool so that the ruler is in a vertical position. When the rule is vertical the cutting tip will also be vertical. This indicates the attitude in which the tool should be held at the commencement of a full cut starting from the outside of the cove.
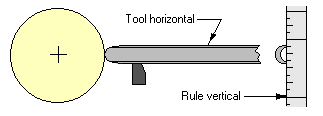
Diagram 14.3 Setting the height of the tool rest
14.8 Beginning stage two
To commence the cut the gouge is held in the horizontal position (as described above), with the bevel aligned with the side of the hollow previously formed (see Diagram 14.4 A), and the tip is then entered into the wood at the edge of the cove. Immediately after the tip enters the wood the tool should be rotated around its axis, in an anti-clockwise direction, and slid along the rest towards the centre whilst, at the same time, the handle is lowered - a twisting and scooping action. By the time the centre of the cove is reached the tool should be flat on its back and more or less at 90 degrees to the axis of the lathe (see Diagram 14.4 B). Throughout this procedure the bevel must continue to rub.
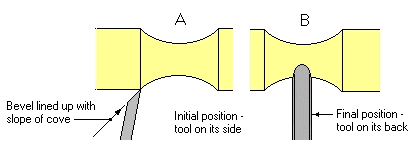
Diagram 14.4 Positioning the gouge
14.9 Practising the cut with the lathe switched off
Not every one will find this cut easy to begin with. One may for beginners to get the hang of it is to try out the various positions of the tool with the lathe stopped. In preparation for this a cove of the required shape should be made as well as possible. If necessary the shape can be trued up with a round nosed scraper. Having done this the gouge should be moved carefully through the procedure checking that the bevel is rubbing the whole time.
14.10 Some further considerations
Before leaving this chapter there are some further observations to be made:
- A cut on the side of a cove does not necessarily have to be made in one continuous operation.
- When cutting a cove (or indeed any shape with a spindle gouge) the cut should be made with the leading edge of the tool.
- When cutting at the centre of the cove the fibres of the wood may not be cut cleanly.
These matters are looked at in turn below.
14.11 Discontinuous cuts
As work progresses on a cove the shape may need to be adjusted. It may, for example, be too flat on the bottom or, the opposite, too steep at the sides. In such cases material may only need to be removed from part of the cove. When starting a cut part-way into a cove the gouge should be placed in the attitude it would have been in at that point had the cut been started at the edge. That last sentence may need thinking about. The point I am hoping to make is that the gouge should be placed in such an attitude that it is pointing down the slope with the bevel rubbing.
14.12 Cutting with the leading edge of the tool
When cutting a cove the cut should be made with the leading edge of the tool. This is best explained with the aid of a diagram.
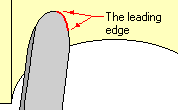
Diagram 14.5 Cutting with the leading edge of the tool
In Diagram 14.5 the tool is being moved from left to right (down the slope) and is pointing slightly in the direction it is moving. The leading edge is the section denoted in red. Cutting within this portion of the edge has two benefits. One is that it provides a slicing cut which severs the fibres of the wood more cleanly. The second, and more important, is that it helps to prevent a 'dig-in'. In order to cut with the leading edge, in the attitude shown in the diagram, the tool must be twisted slightly. If, at this point, the tool should be twisted the other way (ie anti-clockwise) and the trailing edge allowed to enter the wood there will almost certainly be a nasty catch. I know this because I found out the hard way.
14.13 Cutting the wood in the centre of the cove
When the tool finishes a cut in the middle of the cove, as shown in Diagram 14.4 B, it will be cutting directly across the grain. In some species of wood this will result in some tearing of the fibres and a little roughness. In these cases a finishing cut be made by making a short pass over the area concerned with the gouge held at a slight angle and cutting with the leading edge, as described above.
|