INTRODUCTION TO WOODTURNING
Chapter 15: Spindle turning the final cuts
15.1 Introduction
This chapter describes how to perform the last of the cuts to which the reader was introduced in Chapter 8. It covers the following:
- Two methods by which to form a pummel.
- How to create sections of waste wood at the extremities of the workpiece.
- How the ends of the piece can be rounded over or, alternatively, cut square (when required).
- How to part off the waste.
15.2 Forming a pummel
As indicated in Chapter 8 (Section 10) it is sometimes necessary to leave a section (or sections) of a spindle turning square. The most common reason for this is to form a leg of, say, a table or a stool, which must be jointed with rails or other members of the assembly. In such cases it is usual to plane the workpiece into a square before turning. Note that it is necessary to mount the workpiece on the lathe very accurately so that the round section will be centred in the pummel. Two main ways of cutting a pummel are described below.
15.3 Forming a pummel method 1
One way of forming a pummel is to start by making a V cut at the point where the transition from the square to the round is required. The first step is mark a pencil line all round the workpiece where the V cut is to be made. The V cut itself is made in exactly the same way as a V cut in a round section (as described in Chapter 12). Making the cut in the square blank is more difficult because the corners cannot be seen clearly. As a consequence there is a danger of chipping the corners. It may help to put something white, such as a sheet of paper, on the bed of the lathe behind the workpiece; this may help to make the corners more visible. Note that the V must be stopped immediately the bottom of the cut forms a continuous circle around the workpiece.
Having made the V cut the corners on the section of the workpiece beyond the pummel can be removed with a gouge. In doing this care must be taken not to damage the corners of the pummel.
15.4 Forming a pummel method 2
Another method of making a pummel is to use a gouge. In this case the transition from square to round is made progressively. It is done in the same way as cutting a cove but in this case only one side is formed and instead of stopping the cut is carried through to the end of the piece.
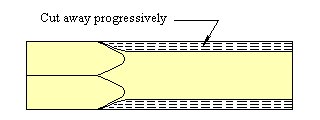
Diagram 15.1: Forming a pummel with a gouge
The cuts are repeated until the section beyond the pummel is completely circular. The method results in a differently shaped transition from the square to the circular section as compared with the previous method.
15.5 Creating the waste
Usually, when making a spindle turning, it is desirable to remove the marks made by the headstock and tailstock centres. To do this sections of waste must be formed at the extremities of the workpiece. It is customary to form this waste at an early stage of the turning so that the length of the piece can be determined accurately. In many cases forming the waste will be the first operation after the square blank has been roughed down and planed smooth. It should be noted that an allowance should be made for the waste when the blank is cut to length at the outset of the job.
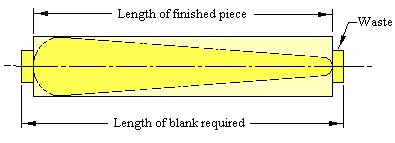
Diagram 15.2: Allowing for the waste
A section of waste is most readily created with a parting tool. First of all a nick can be made with the corner of the tool at the required distance from the end of the workpiece. Then the tool is placed on the tool rest with the cutting edge parallel to the axis of the lathe. The edge is entered into the wood high up, so that the bevel will rub. As it cuts the handle is raised and fed forward so that the bevel is maintained in the rubbing position.
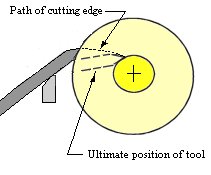
Diagram 15.3: Maintaining the bevel in the rubbing position
The full width of the waste does not have to be removed in one operation. In order to maintain control of the tool it is often necessary to remove the material in stages, as shown in Diagram 15.4.
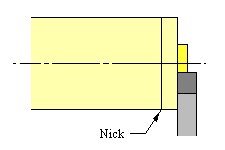
Diagram 15.4: Removing the wood is stages
15.6 Rounding the end
Having created a section of waste it will often be necessary, at some stage of the turning, to round over the end of the piece. This is not difficult and is done in manner similar to that of cutting the side of a bead. The only difference is that to get the fully rounded form the handle of the tool has to be moved round farther when making the final cuts. This is because the bevel must end up more or less square to the axis of the piece.
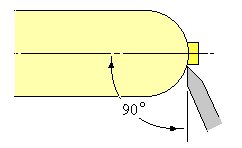
Diagram 15.5: The position of the tool at the end of the cut
15.7 Squaring the end the conventional cut
There are occasions when the end of the piece needs to left square and nicely finished. When the waste has been created, in the way described in Section 5 above, it will be seen that the end grain is very rough. This can be cleaned up with the corner of a chisel used in a similar manner to that employed in a V cut. In this case, as the cut is to be made square to the axis of the piece, the handle of the tool has to be held further round so that the bevel will rub. The position of the tool is shown in Figure 15.6. The point is entered into the wood high up so that the bevel will rub and, to keep it rubbing, the tool is fed forward as the cut proceeds. Note that it is the lower edge of the bevel which should rub and that the cutting edge above this should lean away from the face of the wood to create a clearance angle. As with the V cut only very small amounts of material can be removed with each pass of the tool.
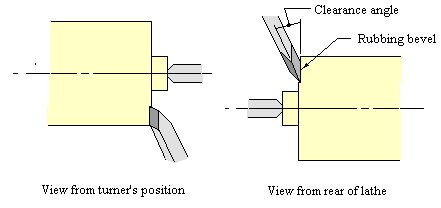
Diagram 15.6: The rubbing bevel and the clearance angle.
15.8 Squaring the end the Raffan cut
Viewers of Richard Raffans video will have seen that he uses a slightly different method for squaring the end. In this case immediately after the point of the chisel has entered the wood the handle is raised so that the wood is cut, not with the corner, but with the cutting edge (see Diagram 15.7).
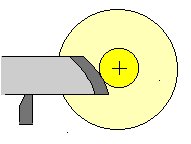
Diagram 15.7: The Raffan method
Using this method the edge of the tool cannot be allowed to lean away from the wood to form a clearance angle as described above. Because of this I think most beginners will find it more difficult than the conventional method particularly when performed with a skew with a straight edge. It may have been noticed that Raffan uses an oval skew ground with a curved edge (see Chapter 3, Diagram 3.5). The advantage of this, for this operation, is that the combination of the oval section and the curved edge brings the points away from the wood. In effect this produces small clearance angles above and below the position on the edge where the wood is being cut; this reduces the danger of a catch.
15.9 The parting cut
In Section 15.2 above the way the waste is created was explained. Now it is necessary to consider how the waste is removed. It is, perhaps, somewhat paradoxical that a tool known as a parting tool is rarely used by an experienced turner for the final act of parting-off. Instead this is commonly done with a chisel. My favourite tool for this job is the chisel with a square section (also known as a beading and parting tool). Sometime, when space is very limited, I use small skew chisel. These are personal preferences, however, and any chisel, skewed or square ended, can be used.
The method, in a nutshell, is to make a V cut on the (imaginary) line which forms the end of the piece. In many cases the side of the v which is on the end of the piece will need to be more or less square to the axis. What it will need to do is conform to the required shape. (See Diagram 15.8.)
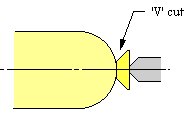
Diagram 15.8: Parting off
When the waste has to be removed at both ends of the piece I always start at the tailstock. I make the V cut as deep as I dare without risking the waste breaking off prematurely. If it does break off at this stage it will mean that the waste at the headstock end will have to be sawn off and there will be a lot of hand finishing to do.
How deep the V cut at the tailstock can be made without the waste breaking off is, of course, a matter of judgement; but a lot depends on the species of wood. On many hardwoods the material remaining can be reduced to a few fibres, but softwoods break more readily. A good strategy is to cut the V as deep as possible whilst leaving enough material to be reasonably certain that there is no danger of premature breakage. Then to go the headstock end and do the same thing there. Having done that return to the tailstock end and remove a little more material. The objective is to cut away enough so that when the piece is taken off the lathe the waste can easily be broken off with the fingers. However, if the too much is turned away and the waste does break off prematurely, there will not be quite so much handwork to be done on the headstock end.
Now, assuming the work on the tailstock end has been completed without an accident the waste at the headstock end can now be cut off completely. The V is made progressively deep until the point is approaching at which the waste will break off. At this point the forward hand (the left hand of a right handed turner) is placed loosely around the end of the revolving workpiece. Using the tool one handed the V cut is continued until the wood breaks and the piece drops into the hand waiting to catch it.
OK: to the novice the last few sentences should raise some doubts and a little apprehension. Fear not; until such time as you have enough confidence to carry out this procedure just make the V cut at each end as deep as you dare and then cut the waste pieces off with a saw. Thats it.
|