INTRODUCTION TO WOODTURNING
Chapter 10: Spindle turning - roughing down
10.1 Setting up
As explained earlier (see Chapter 8 Section 2) the first job to be done when undertaking a piece of spindle turning is to 'rough down' the square blank to a cylinder.
For the first exercise a piece of two by two is fitted in the lathe as described in the previous chapter, the tool rest is positioned, and the lathe set to a suitable speed. For this exercise I would suggest that 2000 rpm is about right.
10.2 Preliminary exercise
As preliminary exercise it is a good idea to try out the tool position, and the way it is to be manipulated, with the lathe switched off. To begin with the work-piece is revolved by hand so that one of the corners is pointing roughly at the turners chest. A roughing gouge is then positioned, with the flute uppermost, so that it is supported by the rest and by the corner of the work-piece. The cutting edge of the gouge should protrude about 1in beyond that corner (see Diagram 10.1).
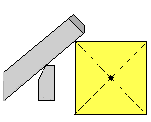
Diagram 10.1 Initial position of roughing gouge
With the tool in this position the turner should check that he will be able to take up a comfortable stance (see Chapter 6 Section 2). If the position is not comfortable the rest should be adjusted accordingly and the need for any other changes considered.
Next, the gouge should be slid back towards the turner, whilst maintaining contact with the rest and the work-piece, until the heel of the bevel comes in to contact with the corner, when the movement is stopped. (See Diagram 10.2) This action should be done several times to get the feel of the required movement.
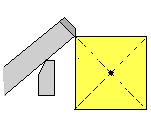
Diagram 10.2 Second position of roughing gouge
10.3 Making the cut
Now the lathe can be switched on. A point on the work-piece is chosen about 6 inches from the left hand end, the recommended stance is taken up, the grip checked, and the action described above is carried out slowly and calmly. The gouge should make contact with the rest first and then the handle is raised until the blade just touches the corners of the work-piece as they come round.
Then the gouge is drawn back until the heel of the bevel is just touching the corners. But now, instead of stopping, the gouge is withdrawn a little more until the cutting edge just comes into contact with the work-piece and begins to take tiny shavings off of the corners. The gouge is now at the position where the bevel can be said to be just rubbing (see Diagram 10.3).
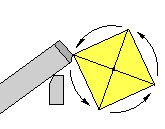
Diagram 10.3 Position of roughing gouge at start of cut
It should be noted that if this is done slowly and carefully there is absolutely no danger of anything untoward, dangerous, or worrying, taking place. So the turner should stay relaxed, but alert and in control; the way a confident car driver would be in light traffic.
We are now in the position where the gouge has taken a few small shavings off the corners of the work-piece. If that position is held the gouge will stop cutting and the turner will be able to see a slight depression in the blur made by the revolving corners. If the gouge is slid to the left, and the attitude of the tool is maintained, then the edge will again begin to take shavings. When the end of the work-piece is reached care should be taken to ensure that the cutting edge does not dip into the driving spur.
It should be noted that as the gouge is slid along the rest the initial cutting attitude must be maintained. If it is not then either the tool will stop cutting or the size of the shaving will increase. The main way to keep the tool in the right attitude is by moving the trunk of the body rather than by separate movements of the arms or hands; but, whilst doing this, it may also be necessary to control the size of the shaving by slightly raising or lowering the handle of the gouge.
10.4 Repeating the cut
When the first cut is completed the tool is returned to the initial position and the cut is repeated again and again until this part of the work- piece is reduced to a cylinder which has no flats left on it. As the cuts are repeated it will be found that, at the initial point, a sloping shoulder will be created. Although it is possible to make roughing cuts to the left or to the right it is not practical to go up a shoulder. Because of this it will be found necessary to start a little further to the left of the initial point each time and to work away from the shoulder.
As this section of the work-piece approaches the cylindrical form the gouge can be turned through an angle of approximately 45 degrees (as seen from overhead) so that it is pointing in the direction it is moving (see Diagram 10.4). This change in approach enables the bevel to rub more effectively thus providing more control of the tool. It also provides a slicing cut which produces a smoother finish.
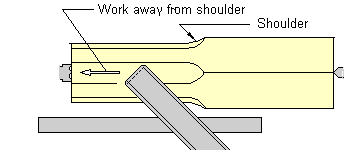
Diagram 10.4 Cuts must be taken away from the shoulder
10.5 The sequence of operations
As soon as all the flats (that is, the sides of the original square) have been removed on this section the lathe is stopped. The rest is moved to a new position (if necessary) and the untouched part of the work-piece is roughed down in the same manner as before. This may be done in a number of steps, depending on the length of the work-piece (see Diagram 10.5).
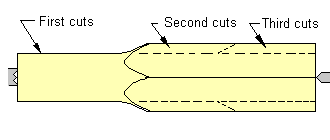
Diagram 10.5 Sequence of operations
When the roughing down has been completed, and there are no flats left on the work-piece, the profile should be reasonably straight and parallel so that a cylinder is formed. This is best achieved whilst the roughing down is taking place by trying to prevent the creation of bumps or hollows. It is particularly necessary to try to avoid hollows when the roughing down is in its final stages. Whenever a hollow is formed the rest of the surface will eventually have to be taken down to its lowest level.
As soon as a reasonably true cylinder has been formed, with no flats, the turner is ready to move onto the next exercise. The surface left by the roughing gouge in the foregoing operations will probably be quite rough. It now needs to be made nice and smooth with the planing operation (see next chapter).
10.6 The direction of the cut
I have suggested that the roughing cut should be made by moving the tool to the left. this is because I think that the beginner will find it easier to control when working in that direction. Nevertheless, it is not much more difficult to make the cut from left to right, and this does have the advantage that the shavings are then shot away from the turner.
|