Home


Frequently asked questions

From time to time I get an e-mail asking me for advice on some aspect of woodturning. I try to answer these as best I can. It has occurred to me that where these answers are of general interest it would be an idea to put them on a faqs page.
If you have a question e-mail me and I will try to help.

  1. Seasoning wood for turning
  2. Vibration on the lathe
  3. Is it necessary to cut the corners off a blank before turning between centres?
  4. What wood would you use for a baby's rattle?
  5. Problems making a mini-scraper
  6. Visualising how natural edge vases are made.
  7. Bevel angles
  8. Sharpening
  9. Finishing tunings made from wet wood
  10. Selecting, identifying, drying, and preparing wood for turning


FAQ 1
Question
I've just had to cut down a Laburnum and a Cherry and am thinking about seasoning the wood for turning; any hints or tips?
Answer
This is quite a big subject, but I will try to boil it down. Timber shrinks most around the annual rings; so when it is drying in the log form something has to give. In a section of any size, ie over several inches in diameter, one or more 'V' shaped splits often open up. If you want to reduce the splitting the best thing to do is to split the log longitudinally down the centre. Very often I don't bother to split it - as wood in this form should be free, ie a gift (I wouldn't normally buy it in this form) I just take my chance that something will be worth salvaging eventually. When you use wood in this form you must expect some failures, ie splitting or warping after the piece has been turned. It's worth noting that turner's often have these kinds of problems with wood bought from the timber merchants.
The most important thing when storing your logs is to keep them cool. They must be kept in the shade in the summer in a well ventilated place. Keep the sections of log as long as you can subject to convenient handling and storage. The reason for this is that the ends of timber in the round will probably split at the ends even if they are coated with something to slow down the evaporation.
You may find that having taken these precautions even the thinner branches may split - I find that some do and some don't - even when they are from the same tree. I don't believe it's possible to predict what will happen with any certainty.
Another question: how long does it take to dry? It is often stated that 1 year of drying should be allowed for each inch in thickness, ie if the board is 3 inches thick then it should be allowed to dry for 3 years. This is only a very crude rule of thumb - much depends on factors such as the species and the storage conditions. As far as logs or limb wood are concerned it is no help at all - it depends on what you want to use it for and the time of the year. As a rough guide small branches a few inches across may be dry enough for some purposes after, say, six months in the warmer part of the year. Sections larger than 6 inches or so may never get really dry.

Top

FAQ 2
Question
Sometimes when I am turning a piece I get a lot of vibration. What is the cause of this and is there anything I can do about it?
Answer
First check the headstock bearings (and the tailstock revolving centre) to make sure there is no play. They should revolve freely but there should be no sideways movement. Assuming there is no problem with the bearings the following points may be considered.
No piece of wood is perfectly homogenous and even when it is turned down to the round a workpiece may be out of balance, ie heavier on one side. If the workpiece is large in relation to the lathe this can cause the lathe to shake. This is most likely to happen with bowls but it can also occur with spindle turning.
The most obvious immediate remedy is to run the lathe at a slower speed. If the lathe shakes at the slowest speed available there are two possible tactics. The first is to add weight to the lathe stand using materials such as bricks or sandbags. The second possible solution is to add some counter-balancing weights. A bowl blank, for example could be attached to a large disk - lead weights are then fixed to the disk and adjusted until a reasonable balance is achieved. I have used this method successfully.
In the longer term it might be a good idea to beef up the lathe stand and add some extra weight permanently. One way of doing this is to build in a trough which can be filled with bricks or sand. Sand is best because it has a higher damping effect on vibration.

Top

FAQ 3
Question
Is it necessary to cut the corners off a blank before turning between centres?
Answer
Not usually. Peter Child once said "there is a machine to do this., it is called a lathe" (or words to that effect). The real question is which is the quickest - to set a saw up to do the job or do it on the lathe?
There are circumstances in which I think it might be desirable to saw the corners off of a spindle turning blank. One is where the blank is very large in relation to the lathe and might cause vibration. In this case any reduction in weight might be beneficial. (See also FAQ 2 above.) Another is where a batch of items are to be turned. In this case the time taken to set up the saw can be spread over a number of items.

Top

FAQ 4 Question
What wood would you use for a baby's rattle?
Answer
I have always used ash for my rattles but I must say that I have not actually made a great many. I made them for sale for a while but then decided that, with the kind of litigious climate we have today, it was not worth taking any kind of risk. Having said that I would be quite happy to give one to a grandchild (were I ever to have one). But note should be taken of what I have to say about finishes at the end of my article.
Back to wood: I think ash, sycamore, beech, holly or any of the fruit woods should be OK; but the best of these English woods may be beech because it splinters less than any other. I wouldn't wish to take any chances with exotic woods. It seems that all the information regarding toxicity is about the effects of dust. I have never seen any information about the toxicity of wood when it is ingested, so it's an unknown area. Whichever wood is used I would rely on the good sense of the parents to take one of these rattles away from a child if there was any sign that it was chewing the wood away. I have never had any feedback from users at all, so I don't know if it is an issue or not.
I have always had great fun making these rattles and I feel that they are very attractive objects in themselves - like little sculptures. So making them can be its own reward. When I used to have them on my stall at craft fairs people used to pick them up and examine them carefully looking for the joins! The last one I made was as a demonstration at our turning club a few months ago.

Top

FAQ 5
Question
I have made your baby`s rattle with which I am quite pleased , but the mini scraper I made from a masonry nail didn`t work very well. I made the handle and glued the masonry nail in and then ground the head but I don`t think I got it right.Is there any chance of a diagram or photo of how it should look when correct.
Answer

scraper1 spacer scraper2.gif - 5538 Bytes


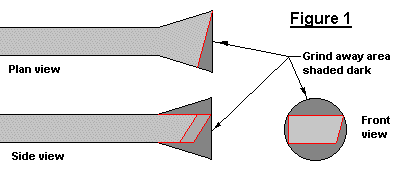
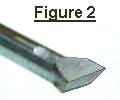
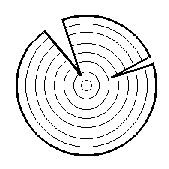
Figure 1 (above) shows three views of a mini-scraper for cutting the left-hand side of a ring. Figure 2 shows a small photograph. The head of the nail is ground as shown.

Top

FAQ 6
Question

I am having trouble visualising how some of the natural edge vases in your gallery are made. Can you help me?
Answer

The photograph above shows one of my natural edge vases. The photograph below shows the piece of log left after I cut off the material for this vase.


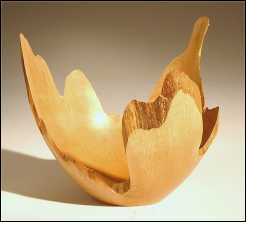
The image on the right (in the above photo) is the view looking straight down on the log. The cross in the middle of the circle is where I place my lathe centre. The points on the wood which touch the circle will be the highest points on the turning, the places where the wood is furthest from the circle will be the lowest points. To find the right place to put my centres I made a polycarbonate (perspex) disk which has a series of circles scribed on it. There is a small hole in the middle. I lay this over the end of the log so that one of the circles touches in as many places as possible and then mark the centre.

So, with the centre positioned as shown, the points A, B, and C will be peaks (high points). The places which I have marked ‘valley’ will be low points. The one on the right will be the lowest because the edge of the log at that point is furthest from the circle (or, closest to the centre). Point D will form a minor peak because the wood on either side is farther from the circle. It will be lower than A, B, and C.

How deep the minor peaks and the valleys are depends on: (a) the degree of irregularity in the outline of the log; and (b) on the slope of the side of the vase. In practice, when the piece is mounted on the lathe, the imaginary circle is described by the point on the rim which is furthest from the centre point. I always try to get as many points as possible on the circle as I can but I don't always get it right. So I may end up with one point higher than all the others.

I always mount the piece between centres to start with. I rough turn the bottom end and then turn a spigot on it to fit my chuck. One way of gaining an appreciation of how the shape comes out, without doing all the hollowing, is to mount an irregular shaped log between centres and turn the outside shape. When doing this you will see the peaks and valleys forming.

Top

FAQ 7
Question
I have just begun turning and am at my wits end on the angles to sharpen my tools. If you can spare a few minutes and give me some starting angles on the basic tools I would be grateful.

Answer I am assuming that by the angle to sharpen your tools you mean what I call the 'bevel angle'. How the bevel angle is measured on differrent tools is illustrated in the diagram below. The bevel itself is labelled in diagram.

In my opinion the bevel angle is not as important as many people seem to think. I have seen anything from 25 to 45 degrees recommended for chisels. Anything in that range will cut effectively. I sharpen mine at around 40 degrees. Similar considerations apply to bowl gouges. Again for normal use I sharpen mine at around 40 degrees. When I want to keep the bevel rubbing in the bottom of a deep bowl I use a gouge sharpened to 55 degrees. It still cuts but not as well. The bevel angle on spindle gouges can be smaller than on bowl gouges - say 35 degrees.

The bevel angle on scrapers is not important. I grind mine at 55 to 60 degrees.

What is extremely important on chisels and gouges is the shape of the bevel. It must be either flat or hollow ground. (Note: this does not apply to scrapers.)

There is some controversy about how tools should sharpened - in particular about what the grit size should be on the grinding wheel and whether the bevel should be honed. I use a 60 grit wheel and normally I do not hone. Sometimes I use a slip stone in the flute of a gouge to take the burr off the top of the edge. Some pundits pour scorn on this method of sharpening - but it works well enough for me (see my galleries).
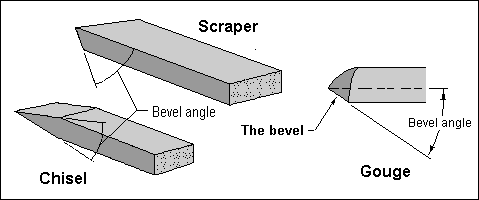

Top

FAQ 8
Question
I purchased a cheap lathe a few years ago, along with some decent quality tools and made pens, and some small trinkets to amuse myself. All I had to teach myself was whatever books I could get my hands on, and from there it was pass and fail as I felt I slowly improved. Then I found your videos and they hepled tremendously. Now, one of my main concerns is how to keep an ultra sharp edge on my tools. Is it possible to do without getting into expensive equipment?
Answer
It really isn't necessary to spend a lot of money on equipment for sharpening. A cheap grinder with good quality wheels is sufficient. There are instructions on how to make a jig elsewhere on this web-site but I think it worth trying to learn how to do most of one's sharpening freehand. I taught myself how to do this when I first started turning and I find it saves a lot of time. The only thing I need a jig for is the Ellsworth type of grind.
For high speed steel tools I use a 60 grit 'white wheel' (ie, aluminium oxide). For a conventional gouge shape I put the heel of the bevel on the wheel first and then raise the handle until the sparks just come over the cutting edge and then rotate the handle. Remember the bevel must be either flat or concave (see FAQ 7 above). It is true that many beginners find freehand sharpening difficult - but it should be accepted that it is a skill which needs practice.
You may wonder why I made a jig if I don't need to use it! The answer is that when I was teaching I found students were spending a lot of money on elaborate and expensive commercial jigs - so I designed my jig for them.
I have looked at sharpening in a lot more detail in my 'Introduction To Woodturning'.

Top

FAQ 9
Finishing tunings made from wet wet wood
Question:
I have been turning or a few years but mostly seasoned wood. I have just recently just started using green wood. My question is about the applying the finish - I like to use tung oil. When is it a good time, while it is still wet or dried out? I have been told I can use a microwave oven to speed up the drying process. Any insight you can provide will be greatly appreciated.
Answer:
The short answer is that I think it is usually OK to sand and finish unseasoned (wet) wood whilst it is still on the lathe, just as you would with dry wood. I oftend do that. This is particularly true if you are using oil. Later, if you are not happy with the finish you can apply more oil and buff it up. In any case some turners like to apply several coats of oil.
There have been occasions on which I have made a goblet from wood from a newly felled tree and the wood has been so wet it has been difficult to sand. In such cases I have either put the piece aside for a day or two or applied heat gently with a hot air gun.
You also raised the question of the use of a microwave oven. This requires a longer answer because it raises a number of issues that I think are worth looking at.
But before considering the use of the microwave it may be a good idea to look at another way in which wet wood can be dealt with. Many turners use a three-stage method for turning bowls from wet wood. They partially turn the bowl and then store it for a time to let it dry. It is weighed at intervals until it loses no more weight. The work-piece is then remounted on the lathe and the turning, sanding and finishing is completed. The reason for partially turning the bowl is that it will dry out far more quickly then an unturned blank. Nevertheless, it will still take several months to dry (depending on the environment) so the wall should turned down as much as practically possible. However, it will probably distort to an oval shape as it dries so sufficient material must be left in the wall so that it can be restored to the circular state when re-turned.
A microwave oven can be used to dry out a piece of wood before it is turned. There are three points to consider here: (1) there is a limit to the size of the piece that can be dried, (2) the time it takes to dry out the wood, and (3) the cost of the electricity. Some years ago a made a few trials and decided that it was only worth using the microwave for very small pieces of wood. However, that should not deter others from carrying out experiments. If that is done the following points should be born in mind.
Whether microwaving a blank or a finished piece the oven should be used on the defrost setting for only a few minutes at a time. Exactly how long will depend on the size of the piece. The aim should be to warm the wood, not to cook it. After a spell in the oven some water will appear on the surface of the piece. When this has dried the process is repeated until sufficient moisture has been removed. The piece should be weighed from time to time to check progress. Some words of warning are required here. I have seen this method described a number of times both on the Internet and in print. These descriptions often state that process should be continued until the piece ceases to lose weight. But if that is done then there will be no moisture at all left in the piece and this is not usually desirable. (This is known as the 'oven dry' weight - for more about this see also 'How dry is my wood?')
There are reports of the use of the microwave by turners on the Internet that are worth looking at - try entering 'wood + microwave' into Google. But do remember what I said, above, about over- drying the wood.
Using gentle heat a microwave oven could possibly be used for drying out a turning in order to prepare it for finishing. But it is possible that this would distort the work-piece and make sanding and polishing difficult. However, I have never tried this and I don't know of anyone who has, so this is another opportunity to experiment.
I have rarely made bowls from wet wood but I have made a number of goblets and vases (see my gallery). I usually make these from smallish lengths of limb-wood (roundwood) which are held on the lathe with the grain parallel to the bed of the lathe. I always sand the piece and finish before removing it from the lathe. And often I sand and finish in stages (see 'Natural Edge Goblets Revisited' on my site.)

Splits in roundwood caused by shrinking as the wood dries

When roundwood in its natural state dries the shrinkage often causes wedge shaped splits. The stresses which cause this splitting are also created in items turned from wet roundwood as they dry. To prevent splitting I turn the wall of a vase or the bowl of a goblet relatively thin so that it will distort instead of splitting. The problem is that the base of such a turning cannot be turned as thin as the wall and there is a risk that it will split. I have experimented with drying them in the microwave. The hope is that, as the oven works by directly heating the water in the wood, it will make it more pliable and so relieve the stresses that cause splitting. I have to say that this is a very imprecise 'science'. I have microwaved quite a number of goblets - sometimes the bases have split and sometimes they have not. I am still undecided about the efficacy of this treatment.
I think it may be better to use a totally different approach and slow down the rate of drying by putting the turning in a paper or plastic bag. It should be stored in an unheated environment. If a plastic bag is used then it should be opened at regular intervals to allow the moisture to escape. By slowing down the rate at which the piece this procedure may allow the stresses to readjust without ill affects. One thing I am sure about is that in winter a wet turning should not be taken from a cold workshop into a warm house as soon as it comes off the lathe.
Top

FAQ 10
Question:
I was wondering if you had any info. on selecting, identifying, drying, prepping various kinds of wood suitable to turning? Any advice or info. would be greatly appreciated.
Answer
This question raises some big issuess.
To begin with I can say that the great majority of hardwoods from the northern hemisphre will turn readily. Most have an attractive appearance but some can be rather bland. Hardwoods from tropical countries can be extremely hard but they too can be turned and many have very nice characteristics. As far as I am aware all soft woods (ie those tchnically known as Gymnosperms) can be turned but most of them will be rather bland and uninteresting. Strange as it may seem softwoods tend to be more difficult to turn than hardwoods. This is largely because they do not cut as cleanly. The major exception to this is Yew; although it is a Gymnosperm it is very hard, has a lovely colour and turns very well. For those who have to buy their wood softwoods tend to be cheaper (particularly in the UK) and are fine for practising the basic cuts, ie those described in my Introduction to Woodturning.
The question of how to prepare your wood for turning raises a lot of issues. If you are mainly thinking of turning bowls it is not a major problem. Bowls can be partially turned from unseasonedwoodm and left to dry naturally for a few months - the turning is then completed and the bowl sanded and finished. If the the bowl is turned completely from unseasoned wood it will probably crack or distort badly. But if it is just a practice piece then that may not matter. Incidentally, 'wet' wood is usually easier to turn than seasoned wood.
For many other turned objects the wood should be fully seasoned. Some notes on this are provided in FAQ 1 above.
The identification of wood, and its selection for various projests are questions that need long answers that I cannot deal with here. However, I can suggest some books which you should find useful.
The bible for all woodworkers is Bruce Hoadley's "Understanding Wood" published by the Taunton Press (from the Fine Woodworking series). A little book I have found useful is by William H Brown: "The Conversion and Seaoning of Wood" published by Stobart and Son Ltd (London). "The Encyclopedia of Wood" by U.S. Department of Agriculture is useful for reference and is very cheap from Amazon. Bruce Hoadly also has a book "Identifying Wood: Accurate Results with Simple Tools" but I have never seen that. I would suggest, however, that if you can can identiy the most common hardwood trees in Canada you will, with a little experience, be able to identity the wood from these just by using your eyes. Another book from the Fine Woodworking series is "Wood and How to Dry It". At the time of writing all of these are available from Amazon.
You might also look at "How dry is my wood?".
Top

© Brian Clifford